Holiday Party Anna

IMG_5814 John's work Christmas party was on Saturday, so naturally I wanted to make myself a new dress. Of course being the procrastinator that I am, I hummed and hawed until late Thursday night. I knew right away which fabric from my stash I wanted to use, but I couldn't decide on a pattern.  I finally settled on By Hand London's Anna, as I have made it a few times before (all unblogged), and I knew that I would have minimal fitting issues as it fit so well right out of the envelope the other times I have made it. Plus I saw the fabulous version that Gillian made for her sister and that pushed me over the edge.

IMG_5807

This gorgeous fabric is a border print that I bought at Tissus St. Hubert back in March when we were in Montreal. It's a beautiful border print and I knew that eventually I would work up the nerve to cut into it.  I have no idea what it's made of. It feels like cotton on the right side and some kind of silk or rayon on the wrong side. What ever it is, it was delicious to work with and to wear.

IMG_5810

Instead of the pattern's gored skirt I went with a simple gathered skirt. I have seen this combo many times (as I'm sure you have too) so I knew it would work perfectly to showcase this amazing border print. Basically, I cut the fabric to the length of skirt I wanted (21" - cause I'm short) and then I just gathered the width of the fabric (which was about 58") and left a seam at the back to match the bodice. This way I didn't have to mess with any pattern matching or anything like that. I am super happy with how it turned out - just the right amount of gathers and the fancy embroidery looks awesome (if I do say so myself).

IMG_5808

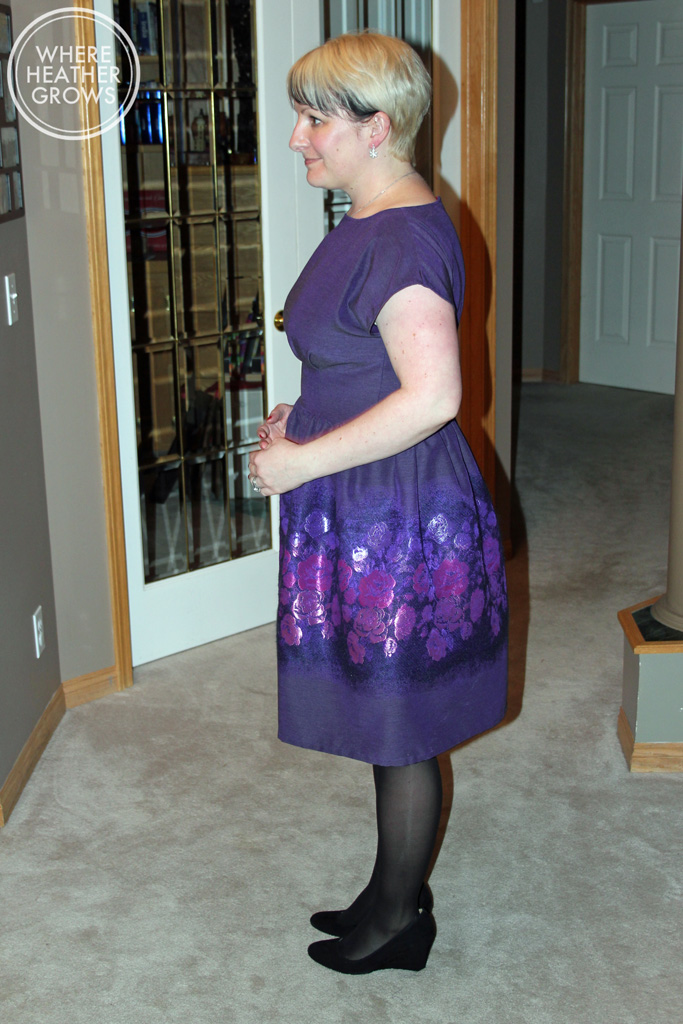
Isn't that fabric gorgeous? Anna is such a quick and satisfying make. I had this baby finished by late Friday night. The only problem that I ran into, was I only had a red invisible zip. After conferring with John I decided to go ahead and insert it even thought it didn't match. I figured that it's invisible anyway, and the red pull looked kind of cool with the purple.  How was I to know that this would be my undoing?!

After inserting the zipper, I tried on the dress to figure out the hem and the zipper broke. Well it split really. After much wrangling, I got the dress off and I could see where some of the stitching got a little too close to the teeth, so I unpicked it and was able to re-route the zipper and all was well. Or at least I thought.

IMG_5809

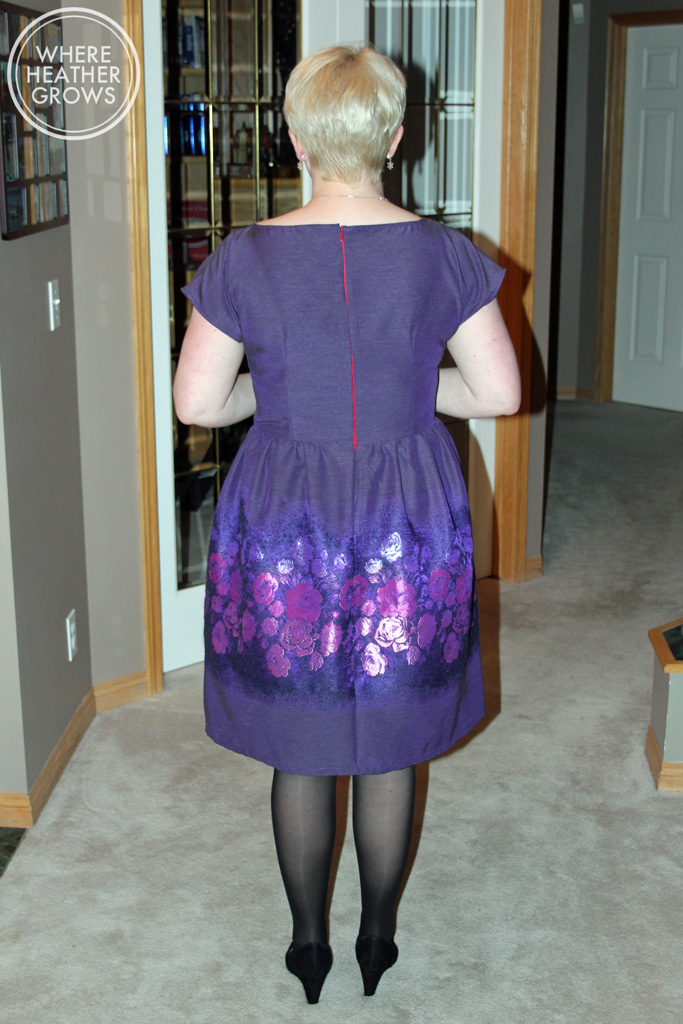
Saturday evening before the party, I put the dress on and the zipper split again. Ugh!! I was so bummed, and kicking myself for not buying a new zipper earlier in the day. But anyway, I didn't. I unpicked some stitching again, cut the end in half, re-routed the zipper pull, and sewed a new stop.  Which luckily worked, and I was able to wear the dress after all.  I did however do the zip up halfway turn the dress around to check the teeth and then twisted it back around for John to do up the rest of the way. So I think that's why the dress looks a bit skewed on my body in these photos. Unfortunately, I didn't realize quite how awful the zipper looked until I started writing this blog post. I swear everything matched up when I sewed it! Oh well! The party had dim lighting. ;)

IMG_5813

John snapped these photos of me just before we left for the party, and in looking at them now, I can see that the dress really looks off kilter on my body. I promise that that is not how it looks in real life, it's just that I had spun the dress around on my body to fix the zipper up, and then turned it back around in a hurry so it was a bit twisted for these photos. I really wanted to make sure we got some photos of it before we left, as I knew we wouldn't really feel like doing it when we got home.  Anyway, it all worked out, and despite my fear of the zipper bursting (I brought a back-up sweater), the dress was fine all night and the zipper held. John assured me that it didn't look this rough at the party, and I got lots of compliments, so all is well.

I am so happy that I was able to make my dress. Sewing is the best! It felt so awesome to be wearing something that I made with my own two hands, that fit me really well, and that I knew no one else could ever have. In the past, I have sometimes worried about arriving in the same dress as someone else - not that that would be the end of the world, but I like to be unique.

Are you sewing a party dress this season? Do you have lots of events to attend?

I hope you all are keeping well and managing not to get too stressed! I'm having lots of fun making some gifts, and stressing about others, but I know it will all work out, it always does!

Ginger Jeans Take 2

First off, thank you all so much for the comments on my last post, for all the helpful tips and support, and also for reading my blog. I have never had so much feedback and I am super grateful for it! Best blogging/hobby community ever! Yay Sewcialists!! Secondly, I have to apologize for these photos. Not my best photography, but the day I took them it was cold and I was having troubles with my tripod, so I took them inside. The colour/contrast is not as good as it usually is but I think you can see well enough to get a good idea of how these Gingers fit!

IMG_5787

So as I mentioned last time, I decided to go down to a size 10. This was a great decision as I think the fit is even better now. I also decided to make the legs a bit slimmer as this time of year I mostly wear boots, and skinnies are so much easier to tuck in. I took a 1/2" off of each side of each leg, grading to nothing about mid-thigh. So that takes a total of 2" off each leg. I used this tutorial and it worked really well.

IMG_5780

The denim I used is from Girl Charlee and I am really happy with it. It's got a nice stretch and it recovers really well. I have been wearing this pair for about 3 days now and they haven't bagged out. They stretch with wear for sure, but not so much that it's noticeable to the outside eye and not so much that I feel like I have to wash them again to get them fitting properly.

IMG_5783

I used a different colour for the top-stitching thread this time too. It's more of a coppery-orangey colour. I like the gold, but I though it would be fun to switch it up. I was debating doing red or blue topstitching too, but I chickened out and went with something more "regular". I don't have much to say about construction this time. The pattern instructions are still very straight forward, and I found things went more smoothly and faster the second time around because I had done everything once before. I really like making jeans. It's so soothing and satisfying; challenging but not overwhelming. I also love wearing jeans so I'm sure there will be many more pairs to come.

IMG_5754

Check out that fit? (I can't believe I am posting a photo of my butt on the internet again, yikes!) I was a tiny bit worried that by going down a size the fit might change, but I am happy to say that I think it just got better. There are still a couple little wrinkles in the front, so for my next pair I might try to lengthen the front crotch just a smidge as Katie suggested in the comments of my last post. But other than that, I don't really want to mess around with them too much.

IMG_5786

I'm not sure if I mentioned this last time, but I had a heck of time getting the topstitching around the fly to look right. I unpicked it three times before I was happy. On this pair, I only unpicked it once. You know what they say, practice makes perfect. Also, I used barracks to sew on the belt loops this time. My beautiful Pfaff actually has a barrack function, so it makes it really easy.

I also took a few shots during construction, so you could see the insides this time.

IMG_8099

IMG_8107

I know Heather Lou suggests having the right side of your pocket fabric showing, but that just didn't seem right to me. I had some kind of mental block about it for some reason. This way if my pocket turns out you see the right side of the fabric.

IMG_8106

I love this rainbow variegated thread with denim (well really, I love it with everything, but it looks extra awesomesauce with denim). One of my favourite things about sewing my own clothes is being able to add little details like this. I love having a unique piece of clothing that no one else will ever have. I can't believe it's taken me so long to really start sewing my own clothes. I can't imagine all the craziness I would have come up with when I was younger. I do remember cutting my jeans up the side seams and adding a strip of fabric. Did you ever do that? A couple of older cool girls at school were doing it, and I loved my pair that I did it to and wore them to death. I wonder why I stopped there? I was probably just too intimidated by fancy patterns. If only I had had the internet back then. The things I would have gotten up too...oh well, I am happy that I am doing it now!

I obviously haven't worked up the nerve to try flat fell seams yet. The serger/overlocker way is just working out so well for me, and it looks pretty too! As you can see, I skipped out on the rivets again. It's not because I don't like rivets, it's because I couldn't find any locally. I have finally ordered a bunch so I will give installing them a try on my next pair. Or I might even add them to this pair, we'll see when they get here.

So there you have it, Ginger Jeans take 2! I have been wearing them pretty much non-stop since I finished them. I can't wait to make more!

What is your favourite thing to sew? Are you doing any handmade Christmas gifts this year, and if so, have you started making them, or are you procrastinating really hard like me?

And just in case you are going through pug withdrawals, here is a picture of Quincie checking out my butt:

IMG_5755


Happy Sewing!

JEANS! I Made Jeans!!

I made Closet Case Files Ginger Jeans to be exact - and I'm pretty tickled with myself. Can you tell? IMG_5739

I would love to tell you that I am a pants fitting wizard and I make pants all the time getting the fit perfect, but I think we all know that just isn't true. This pattern did all the work for me. I feel like Heather Lou drafted this pattern just for me; the fit is amazing! I honestly did nothing to it, well I shortened the legs by 3" but that's it! This is how it fit me right out of the envelope...err..computer pdf file. You know what I mean.

IMG_5741

I took these photos when these babies were fresh out of the wash so there is something going on with the one leg in the picture above, but I assure you it's just cause I didn't straighten them out as I was super excited to get them photographed. Upon looking at these photos, I know there are some wrinkles in the front and the back, but I'm not anxious to mess around with anything as I think the fit is so much better than any RTW jeans I have. But that being said, if you have any advice for me, I would love to hear it.

IMG_5744

I made version A - the mid-rise stovepipe leg version. I am a little scared of the high-waisted version as I am so short, but after making this version and seeing all the awesome high-waisted versions out there I may just give it a go. My top-stitching isn't perfect, but I'm quite happy with it, and unless you get up close and personal, you probably won't notice any wonkiness. I added bar tacks to the back pockets as I didn't have any rivets on hand for this pair, and I really like how it turned out. You want to see another picture of my butt now, don't you?

IMG_5742

I made a straight size 12, and while the fit is pretty spot on, I find them a little loose after wearing them for awhile as jeans always seem to stretch out. They are perfect when the first come out of the wash, but after about an hour they stretch out quite a bit. I took these babies with me when we were away last week, and after about 3 days of wear they were pretty baggy, so for my next pair I plan to size down. In my experience, that's just the way jeans are. On my hunt for the perfect fitting jeans over the years, I've worn high end designers like Citizens of Humanity, J Brand, Paige, 7 for All Mankind, AG, and I've worn Jessica Simpson, Gap, Old Navy, Next, Top Shop, and Joe Fresh (and many, many others). All of them stretch out with wear, so I always try to start with a snug fit. I'm sure going down a size will fix this issue.

I bought this denim from Corrine at The Sewing Affair and it's awesome. It's a gorgeous dark wash, and it's super comfy and soft. After sewing with it, and wearing it, I would definitely recommend it. It's a great weight for jeans, but I imagine it would work perfectly for a skirt or a jacket. I really want to make a denim jacket; know of any good patterns out there?

IMG_5745

The leg on this jean is great (although I usually wear something a little skinnier in the winter as it makes them easier to tuck into boots). It's slim and it looks great cuffed too. I should also mention that I interfaced the waistband with a medium weight fusible interfacing. I love this feature. It makes the waistband maintain its shape. I have a round belly and I usually find that after wearing a pair of pants for awhile, the waistband folds over and kind of bunches up, but that isn't a problem with a little bit of stabilization (is that a word?). It's so awesome to be able to make your own jeans and add little things like that. I also used my rainbow variegated thread to serge all the seams, which looks awesome if I cuff them, and I used a really light weight cotton to line the waistband and for the pockets. For my next pair I will use a little bit heavier cotton as I think it will wear better next to the heavier denim over time.

So there you have it: my Ginger Jeans. I really enjoyed the jean making process and I am just in the process of cutting out another pair (I took a break to blog - FINALLY); I see many more pairs in my future. I am so happy I bought this pattern because it fits me so well. I am now having dreams of cords and chinos, and even dress pants, the possibilities are endless! The instructions with this pattern are really good and the sew along is great for visuals. If you have ever been intimidated by sewing pants, this is a great pattern to quell your fears (well it was for me anyway). And don't be intimidated, it's just sewing. Go slow and sew one seam at a time, it's easy when you break it down step by step. (Another great tool I would recommend is the Pants Construction class by Sandra Betzina on Craftsy. It's awesome and has lots of tips and tricks. Plus Sandra Betzina is a hoot and a wealth of knowledge.)

Have you sewn jeans, or pants before? How did it go? Got any fitting tips and tricks to share? Do you have a favourite RTW (ready-to-wear) pair of jeans that fits perfectly or have you always been searching, like me?

"The Monster was the best friend I ever had." - Boris Karloff

When I first started sewing and reading sewing blogs, somehow, through extreme good fortune, I came across Heather and her blog Handmade by Heather B. I had so much fun reading her posts, seeing her amazing makes, and learning from her tutorials (plus she has an awesome first name, so yeah). She is incredibly funny and talented, and when I found her post about the PJ Eaters, I fell in love with them instantly. Every time they appear on her blog or on her Instagram account I can't help but smile. There is just something about their googgly eyes and their toothy grins. Plus it helps that Heather poses them in loads of funny ways too. Anyway, back in August, the Sewcialists had a Tribute month, of course I never got around to doing anything about it in August, but better late than never, right? Anyway, my tribute is to Heather B, as she inspires me every time I read her blog and every time I see her Instagram posts. So whenever you see my Monsters, think of Heather and her many sewing, fitting, blogging, and comedic talents and know that they are my ongoing tribute to her. IMG_8007

The pattern is by Sew Fearless, and I actually bought it months ago, but never got around to making it up. The pattern has very detailed, comic book like, illustrated instructions and is very straight forward. The pajama eaters are pretty easy to put together, and are a great way to use up scraps.  The only really tricky part for me was hand sewing their bums together after they were stuffed (oh and sewing the soles onto the feet was a little tricky too, but Heather has a great tutorial about that too). I am really not a very good hand stitcher and if I could have figured out a way to use my machine to do it, I would have, but in the end it worked out okay.

I ended up following Heather's lead, and making my guys out of Robert Kaufman 21 wale corduroy from Fabric.com. Its super soft and comes in lots of great colours. I also bought my zippers, felt, lining fabric, and stuffing from Fabric.com too. It was so easy to just order everything I needed in one place. (Okay, that just sounded like an advertisement, but I promise you, I am only a customer and not affiliated with them in anyway.) I have a couple more colours of the cord, as I plan to make a whole army of monsters. And I want to tell you I will give them away, but right now I just want to keep them all to myself.

Of course, this wouldn't be much of a monster tribute post, if I didn't pose the monsters in funny situations ala Heather, so here we go. Once the monsters were born, they were very hungry and looking for food. First stop was John's chair, where they discovered his potato chip stash:

IMG_5691

IMG_5692

This did not satisfy their hunger, so it was off to the couch to find chocolate:

IMG_5693

Still hungry, they headed to the pantry, where they decided to test out the dog food:

IMG_5695

Quinice was not impressed, and promptly shooed them away:

IMG_5697

Finally, they found what they were looking for:

IMG_5699

FABRIC SCRAPS!! FEEEEED MEEEEEE!!

IMG_5700

The pugs seem to approve of this nourishment decision:

IMG_5704

Suddenly, there was a knock at the door:

IMG_5706

The UPS man, whatever did he bring us?

IMG_5708

MOAR FABRIC!! NOM NOM NOM!

IMG_5710

Once their bellies were full, they hijacked my iPhone to listen to the latest episode of Serial. Have you listened to it yet? It is sooooo good and I am soooo addicted.

IMG_5705

That was a lot of excitement for their first day at Casa Gibson, so it was time for a nap. The pugs' window side bed looked like a good spot.

IMG_5712

Then Jackie Boy decided to get in for a cuddle:

IMG_5714

So as you can see, I am having way to much fun with my monsters. They are currently sitting at the dining room table, aka my sewing table, and they make me soooo happy. I can't help but smile every time I look over at them, and don't be surprised to see more of them in my Instagram feed and possibly even here on my blog. Hopefully Heather knows that imitation is the sincerest form of flattery.

Happy sewing my friends!

The Sutton Blouse: Numbers Two and Three

Hooray for multiples! Right? You guys like seeing multiples right? I really wanted to make the coloured blocked version of this blouse, and while I was cutting it out, I thought, why not make a second print one too. And so I did. (Both these blouses are made with the Tester version of the pattern - Kelli has since removed about an inch of width wise ease - so keep that in mind - again.) I made a straight size 8 again. Let's start with the printed version. I made this one with a gorgeous floral crepe from Blackbird Fabrics.

IMG_5671

Speaking of which, have you checked out Caroline's new shop? I was so excited when she announced the opening, that I jumped on my computer and ordered a bunch of fabric from her. We don't have a ton of great online fabric shops in Canada (and finding apparel fabric in Calgary is a huge challenge), and it costs a small fortune for shipping from the US, plus you sometimes have to pay duty and customs fees on top of that. Yikes! So needless to say I was thrilled to have somewhere to shop in country and I wanted to be sure to show my support. Caroline really knows her stuff, and she has a great selection of apparel fabrics.

IMG_5667

This crepe was really lovely to work with, and it feels really nice against the skin. I think I must have stretched the neckline out a little while sewing, because it lays a little wonky at times. I didn't really notice until I saw it in pictures, but it tends to lie a bit weird. Oh well!

IMG_5665

I am really loving this blouse. It's so easy to throw on with jeans, and it's nicer than a plain old t-shirt. It also goes really nice with a big chunky cardigan over top, and I'm wondering how it might look over top of something long-sleeved, but I haven't tried it yet. I love how it's loose but also how it curves in at the sides to flatter my shape. And I am totally digging the length of the kimono sleeves.

IMG_5662

Okay, onto the colour-blocked version.

IMG_5627

This is probably my favourite one to wear (can you tell? Why do I look so unimpressed?), but it was definitely the most difficult to sew (ohhhhhh...). It has nothing to do with the pattern, and everything to do with the fabric.

IMG_5625

The solid navy fabric is a gorgeous Rayon Challis from Fabric.com. It is actually amazing; super soft and flowy and almost a bit brushed looking. I want to order yards and yards of it in every colour. The colourful sailboat fabric, which was a huge pain to work with, is a crepe de chine from Girl Charlee. Why do you always lure me in with your gorgeous prints Girl Charlee, why?!?!  I love the colours and the print is adorable,  but it was super slippery and crazy difficult to cut, and to be honest it's really thin and feels quite - dare I say it - cheap. It looks really lovely though, and it has the perfect drape for this blouse.


IMG_5623

I am not sure if you can see it very clearly, but there is a seam in the middle of the yoke that should not be there. I made a huge mistake with this one. Somehow I twisted the yoke (after I had completed the gorgeous neckline) while I was seaming the front. I was so happy with how my french seams turned out until I noticed my mistake. This fabric is way too delicate (and it had already been fraying like crazy) so I didn't think it would survive unpicking. That left me with two choices: a) toss it and start over, or  b) cut the yoke in half. I went with option b.  Unfortunately, the seam isn't dead centre, but I can live with it, and it's totally not going to stop me from wearing it.

IMG_5628

I love how this blouse looks with a contrasting yoke. I think there are a lot of colour-blocking opportunities with this pattern. I have visions of a printed yoke with a solid body, or even making each front side a different colour (would that be too 80s?). I am also starting to wonder how it might work in a lightweight knit. It would have to be drape-y but I think it would look really great. I think that's one of the things I love most about sewing, you can take a pattern and really make it your own based on your colour and fabric choices. I love that I can make something, and no one else will ever have the same thing.

Anyway, I am off to do some christmas sewing. I'm actually sewing for someone else, can you believe it? I'm really excited about giving some handmade gifts this year - so keep your fingers crossed for me that they all turn out.

Are you sewing/making any gifts this year? Have you started yet?

The Sutton Blouse

Have you guys seen the gorgeous new pattern by True Bias? I actually got to be a pattern tester for it. I have never been a pattern tester before and I was absolutely thrilled when Kelli asked me. I was so flattered that she had confidence in my sewing ability, but also because she was interested in my opinion. Because I love her first pattern the Hudson Pant, so much, I already knew that I would pounce on any subsequent designs she released, so getting it for free in exchange for feedback was such a bonus! I mean I was gonna sew it up and blog about it anyways. IMG_5571

First, let's talk about the pattern itself. This is a 19 page pdf pattern and it went together very easily and really quickly. I had no problems lining up the marks and I used a glue stick to put it together. The pattern is beautifully drafted, and all the markings match up perfectly. The instructions are very detailed and easy to follow, and they contain definitions of techniques and diagrams (I am a visual learner, so I love a good diagram). This pattern is rated intermediate because it calls for more slippery fabrics, but I really think that if you are an experienced beginner and you took your time, you would have no problem. I think sewing with a rayon challis or a voile would make it a touch easier, than starting off with something like chiffon or silk.

I made a straight size 8. Based on my measurements, I should have made a size 10, but as this top was described as loose fitting, I chose to make a size 8. Since the testing process, Kelli has actually removed some of the ease out of the width (an inch to be exact), so keep that in mind when you are looking at my photos and choosing your own size. When I first saw photos of this pattern, I loved how it looked on Kelli, but I wasn't sure if it was going to work on my shape. It's a little bit loose and boxy, and I haven't had a lot of luck with those types of tops. But I am always up for trying new things out and I was pleasantly surprised with how much it actually flatters my shape. I think it skims over all the right places while still maintaining a nice shape.

IMG_5550

Full disclosure, this was my first time working with a slippery fabric, and also my first time with french seams. With that in mind, I think it turned out really well.  I think the trickiest part was actually cutting the blouse out. The fabric shifts and moves which can cause problems, but I think it worked out okay for me. The french seams turned out really nicely too and is the perfect way to finish a delicate fabric. I love how the inside looks, so professional.

IMG_5560

This fabric is a flowy crepe by Moda. When I saw this print on Fabric.com, I had to have it, and I bought it with this top in mind.

IMG_5558

I think my favourite part about this blouse is the neckline. It is exactly the right length, and in my opinion hits at exactly the right spot, plus Kelli has an awesome technique to finish it. I love how it turned out.

IMG_5577I am also totally digging the high low hem and the side slits. This top is a perfect wardrobe staple in my books, as it works really well with skinny jeans, but can also be dressed up with skirts. I think it would also work with leggings as it has enough butt coverage. But I guess that depends on where you stand on the whole leggings as pants debate. I think it would be totally office appropriate with a skirt or trousers, and it makes you feel a bit more put together than just a regular old t-shrit when paired with jeans. I made this top before we went to London and it packed really well. I didn't have to iron it, and it was super easy to through on.

Kelli has such a great style and it really shows in her pattern designs. I really love that she has taken the time to put together really detailed instructions with diagrams, and I happen to know that if you were ever stuck, you could email her and she would happily help you figure out anything that might trip you up.

So all and all, I really have nothing but love for this pattern. In fact, I love it so much that I have already made up two more which I will share with you later this week. What can I say, I love multiples.

London: We did other things too!

So we are back home from London, and I thought I might share a little of our trip with you. I know it appears that the only reason we went was to fabric shop, but that's not really true. That was just an added bonus. John and I have been to London a number of times now and we both adore it. We both fell madly in love with it the first time we went, back in 2007. I'm not sure what it is; if its the hustle and bustle, the cornucopia of entertainment, the history of the city, the old buildings mixed with the more modern, the amalgam of cultures, or maybe it's the people, but whatever it is,  it's  captured our hearts. We've pretty much done all the touristy things that one does, although I imagine there are still more things we could do if we wanted to. We both dream of having our own flat in London someday, so now when we visit, we like to pretend to be Londoners and do things that we might do if we lived there. Does that sound silly? Anyway, here are some of the things we did this time. Get ready for lots of pictures!

We saw Lady Gaga at the O2. She put on an amazing show. Lots of costume changes, wig changes, lights, smoke, and dancing. When she first hit the scene back in 2008 with Just Dance and Poker Face, I thought she was just another bubble gum pop star and I wasn't overly impressed. But then I saw her on Saturday Night Live, and it was just her and a piano and she sang. I was blown away by her voice, and her genuine talent. I've loved her ever since. I would love to see her "unplugged" one day, but this show was pretty amazeballs too. Given the opportunity, I would definitely go see her again.

IMG_7544

IMG_7554

IMG_7564

IMG_7566

Here is my incredibly patient husband getting covered in Gaga confetti. He's not as big a fan as I am LOL.

We went to Portobello Road Market - a favourite for sure, but sadly no fabric. I love to people watch and check out the old antiques. There is also a ton of food and new items too. It's always packed though, so prepare yourself for crowds.

IMG_7617

IMG_7616

IMG_7618

We went to an NFL game! And I feel like I actually get football now. Yay! John was so great at explaining everything to me, and this time I actually listened. :) It was at Wembley Stadium and it was packed. We had fun.

IMG_7624

IMG_7625

IMG_7628

IMG_7632

IMG_7649

We went to our favourite movie theatre (twice!) - Electric Cinema. The first time we went, we saw The Judge (I didn't take pictures) and the the second time we saw Fury. Electric Cinema is the best. You get to sit in leather lounge chairs with foot stools or leather sofas (it depends on what you book) and you can order hot food. I had wings when we saw Fury and they were delicious! It's in this old theatre and it has so much character. We try to go there at least once every time we get to London.

IMG_7660

We ate a lot of food. One of our favourite new places is Byron Proper Hamburgers - the burgers were soooo good. We must have eaten there 4 or 5 times because we just couldn't get enough, and there seems to be location everywhere.

IMG_7484

IMG_7722


This is pizza from Pizza Express. I was dying for pizza and this really satisfied my craving.

IMG_7701

This is pretty much the very best chicken I have ever eaten; the Shwarma platter at Harrods. So delicious!

IMG_7476

We took the tube and minded the gap, and we took the bus all over. There's nothing like riding up top at the front of a double decker bus.

IMG_7704

IMG_7703

IMG_7762

We went to the Royal Albert Hall for London Blues Fest. We had tickets for two separate nights. One night we saw Elvis Costello and he was brilliant. Such an amazing voice, even after all these years.

IMG_7738

IMG_7742

And on the other night (Halloween), we saw Sheryl Crow. She was so good! She sang for just over 2 hours straight, and I knew pretty much all the words to all the songs she sang. She put on a really good rock show and it seemed like she really enjoyed herself. The Royal Albert is such a great place to see a concert. The sound is amazing and no matter where you sit, you can pretty much see everything. John and I both jump at the chance to go there.

IMG_7765

IMG_7768

IMG_7773

On the day we went to Raystitch, we spotted a record store across the street. John has a growing vinyl collection so we went in and found him some records. There was quite a selection and I was happy to be shopping for John after he had been so patient shopping for fabric with me.

IMG_7708

IMG_7707

So those are pretty much the highlights of this trip. I have blogged a ton about London already which is why I didn't got into great detail here, but if you ever want to know more, feel free to ask. We had a really great time, but I am happy to be home snuggling with my pugs and sleeping in my own bed.

Do you have a favourite place to travel? Do you find somewhere you love and go there over and over, or do you prefer to explore new places?

Fabric Shopping in London: Raystitch

Okay this is my final post about fabric shopping in London I promise (well at least for this trip anyway). I had heard about Raystich a few times through various blogs (here, here, and here to mention a few), and also when Janet told me in the comments that I needed to go there. I am so glad that I did because it's basically one of the coolest shops I have ever been to. I love everything about it. Even John commented on how cool it was. (Also, they have a fantastic website, and they seem to ship worldwide.) IMG_7710

Raystitch is located in Islington, kind of near the Camden area, I think. We took the tube there (the Northern line to Angel station), and then the bus about three stops. You could probably walk from the tube station, but it was pouring rain so we took the bus.

This shop has pretty much anything and everything you could wish for in a sewing shop. I have this totally unrealistic dream of opening my own fabric store/haberdashery and Raystitch is pretty much exactly how I would want it to be. It is absolutely stunning!

IMG_7711

IMG_7712

IMG_7718

IMG_7720

IMG_7717

Totally gorgeous right? Then you go downstairs where they have a nice class area, with a little kitchen and really nice bathrooms. There is even have a back garden!! I could totally live in this shop LOL.

IMG_7716

IMG_7713

IMG_7714

IMG_7715

This charming little shop is filled to the brim with exquisite fabrics (tons of amazing apparel fabrics), patterns, books, zippers, buttons, knitting needles, crochet hooks, fabric dyes, tons of notions and pretty much anything you could ever need to sew, knit, crochet, or quilt a stunning project. There is fabric everywhere, but everything is super organized and beautifully displayed, so it doesn't seem overwhelming and it's easy to pick things out. I really loved that they had actual garment samples of patterns they sell. There were also lots of quilting notions and some gorgeous quilting fabrics. The staff was extremely sweet and very helpful too. I could have spent pretty much the whole day there. If I lived nearby, you'd probably find me hanging out everyday and taking all the classes they offer. I so, so, so wish there was something like this in Calgary. I can only imagine the community you could build around it.

By the time we got to Raystitch, I had pretty much blown through my fabric budget, but I wanted to pick up some patterns. Specifically a couple of By Hand London patterns, and some Merchant Mills patterns to save on the shipping. I ended up coming out with a bit more than planned, but I am super happy with my picks. John also picked me out two fabrics that I couldn't leave without too.

IMG_7728

I'm not entirely convinced that I'm going to actually make the Holly Jumpsuit, but I've seen a number of cute dress hacks and I love the wide leg pant, so it was an impulse buy.

IMG_7729

IMG_7731

I also may have picked up a couple more unplanned things:

IMG_7726

I have been lusting after this coat pattern since seeing in on Sunni's blog (and then she made her Mom and sister coats too!), but I noticed that it is rated Advanced so I'm a little nervous about it now. But how cool does it look?

IMG_7733

So, there you go, now have enough fabric and patterns to keep me going for months on end. Who am I kidding, you can never have too much fabric, am I right?

Anyway, if you ever go to London, I would definitely recommend a visit to this shop. I absolutely loved it! Totally worth checking out!