Burnside Bibs

Heeeellllooooooo Everyone!! How are you? So that was a blogging hiatus I didn’t really mean to take. But nonetheless, I am back, and with brand new pair of overalls to boot. These are the Burnside Bibs by Sew House 7. I’ve been eyeing this pattern since it came out, but was never sure if this style would work on me. After a lot of thought about overalls, I decided it was silly not to make myself some.

IMG_3088.jpg

I have always been worried that overalls would make me look frumpy and childish, and yet I kept pining after them (not to mention collecting overall and dungaree patterns). So last year I finally bit the bullet and made myself some Roberts Collection dungarees, and I loved them so much I made 2 more sets (see here, here and here). And I have been steadily working through my collection of overall patterns ever since. I just love them! They make me feel good. I don’t get it really, maybe it’s because I had some amazing denim overalls that I wore all the time when I was in my very late teens/early twenties that I adored, and that I remember wearing in a lot of great memories. I don’t know, but whatever it is, I’m embracing it.

Anyway, back to the Burnside Bibs. This is a great pattern that comes with two bib options (a curved one and a straight one), two leg length options, and two fit options, one with a more fitted waist and an invisible zip (which is the version I made) or one with a more paperbag waist. I think these are quite a fashionable, almost sophisticated version of overalls, and they kind of have that chic art teacher vibe (which I love). The instructions included with this pattern were very thorough and clear (as long as you actually read them LOL), and the pdf went together smoothly.

IMG_3094.jpg

I decided to go with version 1, with the curved bib and a cropped leg. Unfortunately, I misread the instructions and chose my size based solely on my hip measurement. Turns out, that is the direction for picking a size for version 2 (the looser waist version). So, I went with a size 10, when really, I probably should have taken my waist size into account and went with a size 12. Luckily, the seam allowance is 5/8”, so I was able to let the seam allowances out a little and get some extra room. They fit pretty well albeit a little snug around the belly, but if I make them again I will definitely go with a size 12. I also left out the invisible zip, because I let the side seams out so much, there really wasn’t enough seam allowance left to have a securely installed zip. That being said, I can JUST get these over my hips, which makes for interesting bathroom breaks. LOL. The invisible zip probably would have made things easier there. Ha!

IMG_3141.jpg

I cut out the cropped view, and made no adjustments whatsoever, so I think the fit is pretty darn good. I wasn’t sure exactly where the cropped leg of the pant should land, so I took to instagram for advice. The general consensus was to have the cropped hem hit about 1 inch above the ankle bone. So that is what I went with and I am pretty happy. This required me cutting 2 inches off the bottom of the hem, so I’ll make that adjustment to the pattern piece next time. I think anywhere from 1 - 3 inches above the ankle bone is the right answer for crops, it’s just down to personal preference. I wore these for a full day and am quite happy with the length. I always like having a little ankle cleavage.

These are also giving me hope that I might actually be able to pull off the cult status pattern: the Persephone Pants. I sooooo want to make those, but I’m so worried they’ll look more clownish than fashionable on my short legs. LOL. But you gotta try, and I find as I get older, I’m more likely to embrace styles that I like, even if other people don’t think they look “flattering”. How do you feel about that? Do you wear styles that aren’t traditionally flattering? The Hubs does not like these at all. He’s warmed up to my other overalls, but he is not a fan of these at all. I think it might be the wide legs.

I’m also not 100% sure what tops to style these with but I think tanks will be great for summer (this little striped number is a Greenwood Tank).

IMG_3111.jpg

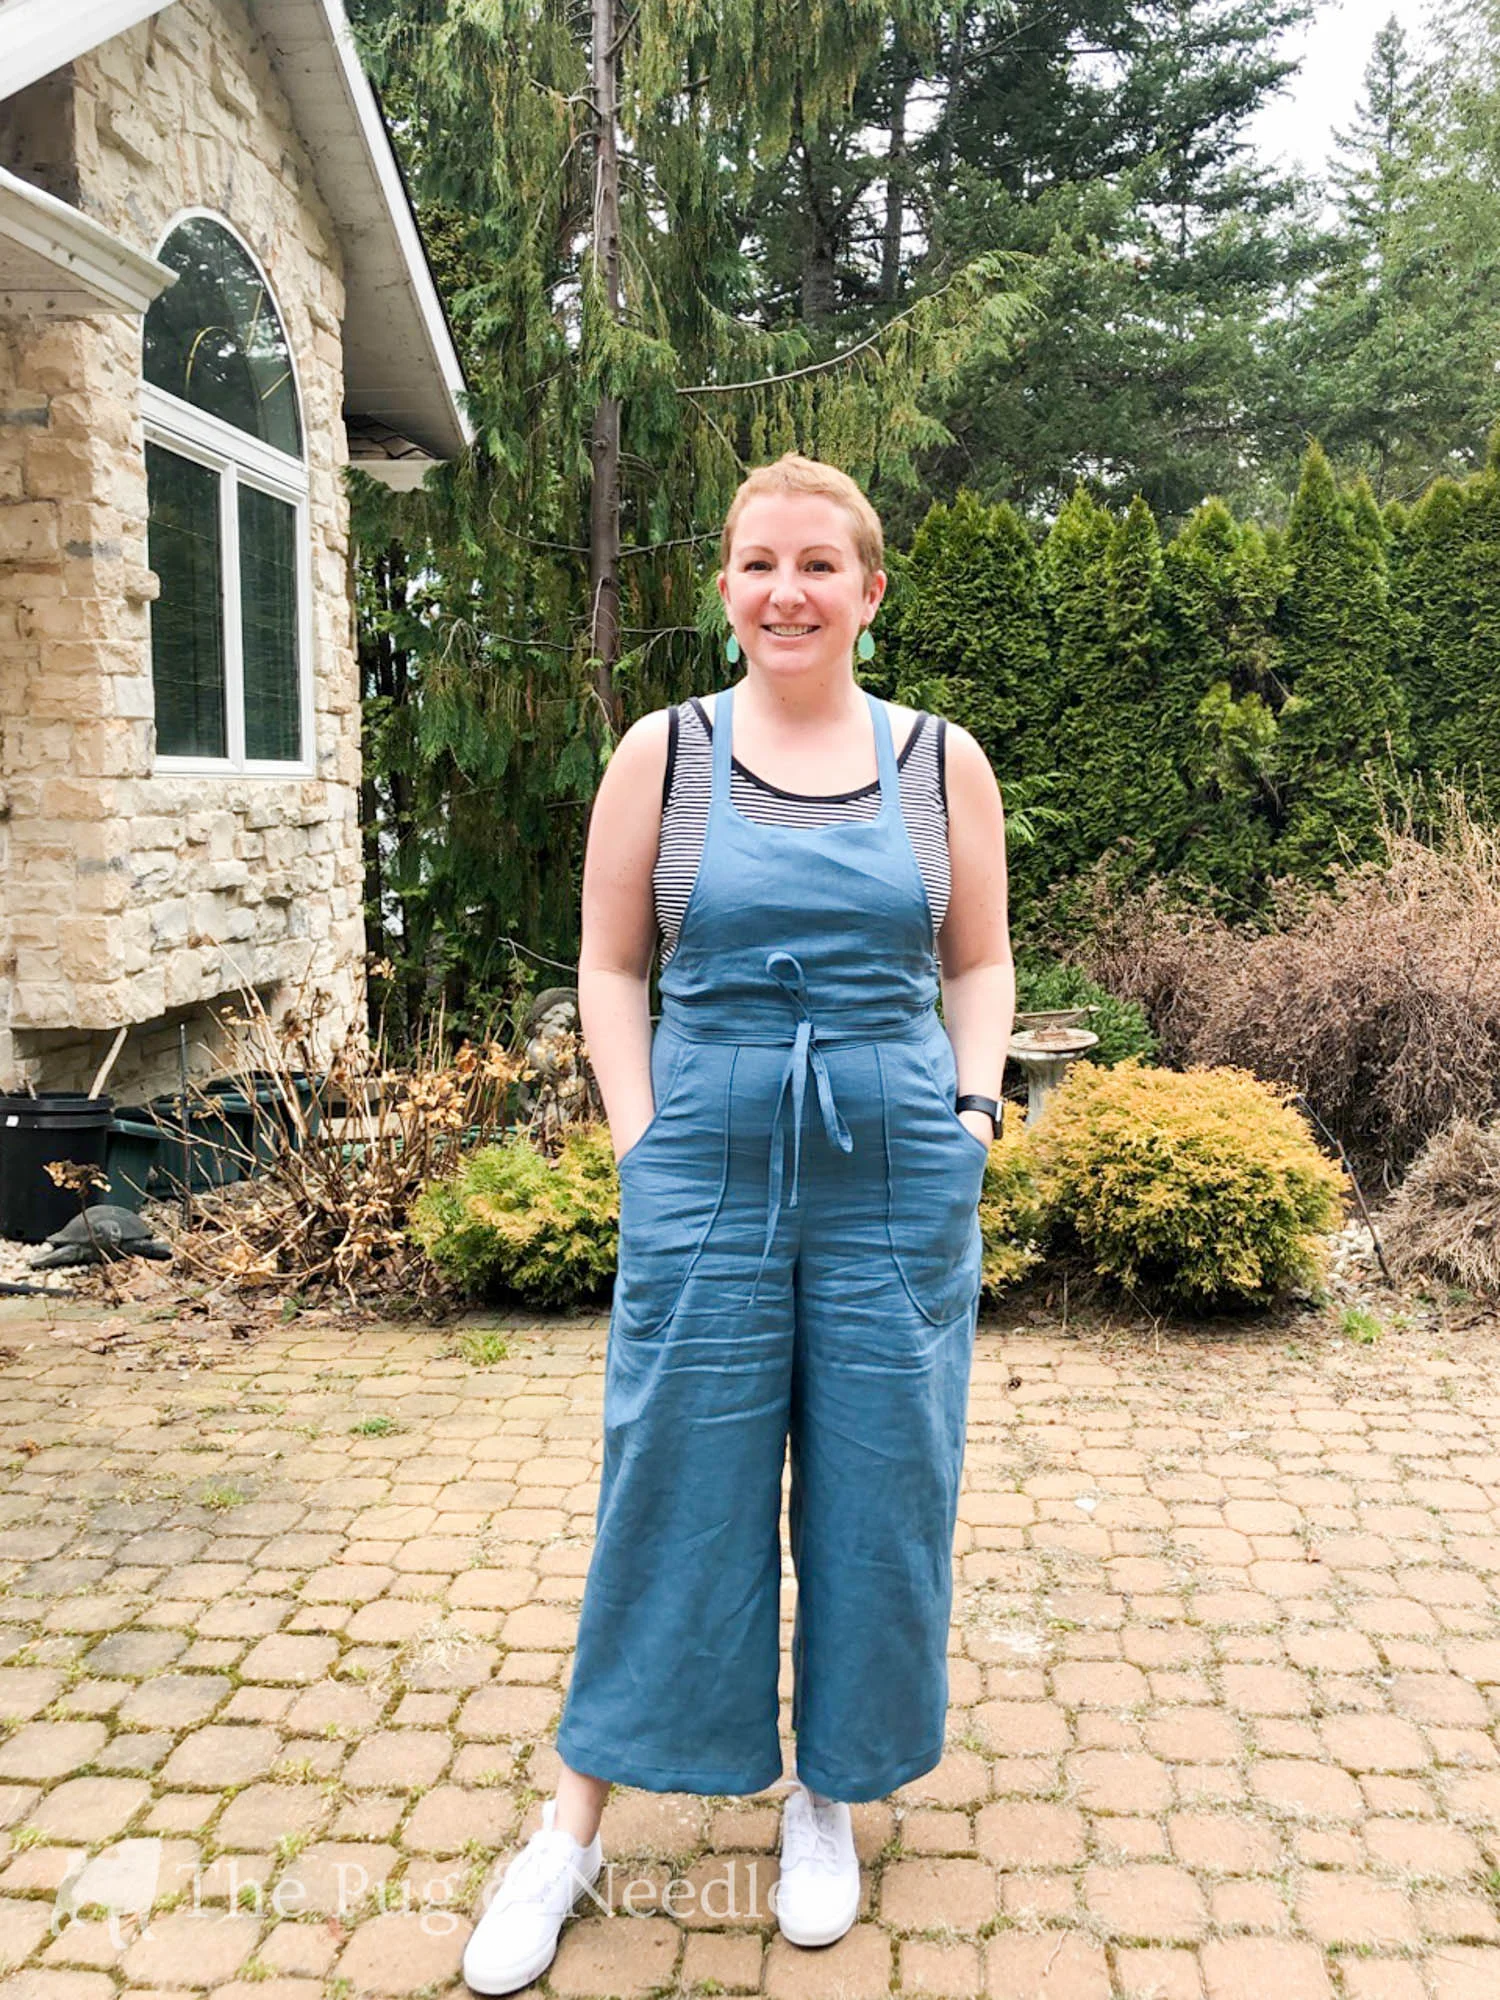
Oh, I should also mention the fabric. This fabric is quite special because I bought it at the now closed Fabric Store in LA , when I went to meet Katie a couple years ago (the Fabric Store is still online and in Australia, but they closed their LA location). I got this and another piece of linen which I have been hoarding in my stash. It feels really good to get something made with it, and now every time I wear these I’ll think of Katie and that trip. Yay!

I should also mention, I felt motivated to sew these Burnside Bibs because of my friends Heidi, Meg, Teri, and Jessamy, and the #sewbibs challenge they put together. This is the last week, so I’m just squeaking in, but I had a lot of fun following along on Instagram. So much inspiration!

Anyway, hope you’re all well, and thanks for reading!

Happy New Year!

Oh dear! How did it get to be January 15th already?!? I had hoped to blog a bit more than I did in the past month, but so many things got in my way. I caught a terrible "man cold" from who knows where, which kept me in bed for days, and then sadly, a few days after Christmas, my dear Uncle passed away. He had been battling pancreatic cancer for the last year or so, so it wasn't really shocking, but having just had a really great visit with him over Christmas, it was a surprise that his death came when it did. I am so grateful that I was able to have such a great chat with him on Boxing Day and I will hold that memory of him for a very long time. Anyway, enough about that. Let's talk about sewing! 

This is the Silvia Coatigan by Schnittchen Patterns. (Heads up - these are not the greatest photos. The white background is not really doing me any favours, plus I seem to have *ahem* misplaced my remote, so I had to do the whole push the button and run in front of the camera thing. Then just as I was all set up it started to snow, so if you see weird white flecks, they're snow flakes.) 

This pattern wasn't really on my radar, until Caroline (of Blackbird Fabrics) made mention of it somewhere (I can't find the post on her blog or instagram, but I swear she mentioned it somewhere). Anyway, I checked it out, and I thought it would be a great in between seasons piece. Calgary is so weird in the winter because of the Chinooks. One day it can be freezing and you need a super warm, down parka, and the next day it's sunny and warm and you are sweating in said parka. So I thought this would be a great "coat" for those days, but I also wanted to keep it soft and fairly unstructured so that I could wear it inside when I'm feeling like I need an extra snuggle.

I ended up choosing this fabulous wool boucle from Blackbird Fabrics, and it worked out perfectly. It's nice and warm, and wooly, but still soft and drapey like a cardigan. I thought that I might be able to get away with not lining this little number, but when the fabric arrived, I decided it was a bit too itchy against the skin to go without a lining. 

I have never worked with wool fabric, or wool coating, so I wasn't exactly sure how to pre-treat it. I did a bit of reading, but then emailed Caroline for some advice. As always, Caroline was very helpful and after emailing back and forth with her,  I decided to try the steam function on our new dryer. After about 30 minutes the steam cycle was complete and the wool looked great with very little shrinkage. If our dryer didn't have that feature, I think you would have steamed it with my iron, but that seemed like so much work - especially when there is another option. I also asked Caroline for her suggestions about lining, and she graciously sent me some lovely modal knit from her personal stash. Sewing friends are the best! The knit fabric is perfect!

As for the pattern, I have never worked with a Schnittchen pattern before, so I was very surprised that the pattern pieces were contained in two separate pdfs. This took me a while to figure out as there was no print/pdf layout. At first I thought I was missing some pattern pieces, but then I remembered the second pdf, and lo and behold, there they were.  This was not my favourite experience putting together a pdf to be completely honest. I had a hard time getting all the markings to match up and the borders weren't super clear, so my pieces were slightly wonky in a few places. Now this might be my printers fault, as it can be cranky sometimes, but I haven't had this much trouble with other pdfs, so I'm not sure.

All that being said, this coatigan came together rather quickly, and I mostly put it together with my serger. I did have a bit of trouble with the lining but I think that's because I haven't lined very many coats/jackets, so I didn't really know what I was doing, plus I was using a knit fabric with a woven. The instructions are only written (and fairly brief but they are translated into english so that's a good thing) with no diagrams which probably works just fine for an experienced coat sewer, but I am very much a visual/kinetic learner and so I require more hand-holding than just words (at least when I'm doing something for the first/second/third time). Anyway I turned to Jen's fabulous tutorial and kinda did my own thing. It turned out pretty well, so I can't really complain. And the knit lining is part of what makes this so cozy, so I'm really happy I didn't leave it out. 

I have pretty much worn this non-stop since I finished it. I wore it around the house with my Hudsons while I was sick, and I reach for it pretty much anytime I'm running out the door (unless it was one of those really cold days we had there). It's slightly bulky, but I think that's part of the appeal. It's like being wrapped in a blanket and I feel really stylish when I'm wearing it. I also love the colour and it goes with everything.

According to the size chart, I should have made a size 42, but I ended up going with a 40 because I knew I was mostly going to wear it open, and I didn't plan on adding any closures. I didn't make any changes to the pattern at all. I thought I might have to shorten it, but I didn't and I think the length is just fine on me. I'm really happy with the fit, and I know I will continue to wear this a lot.

I hope you all are doing well and enjoying your New Year so far. I feel kind of crappy that I didn't get any year end roundups done like I did last year, but C'est La Vie!

Have you ever made a Schnittchen pattern? What did you think?

More Jeans & Other Makes too!

Hola peeps! How are you all doing on this fine Friday the 13th? Things were going pretty well for me until I had almost completely finished this blog post and Safari crashed and I lost it all. UGH!! (It actually happened twice, so I switched over to Google Chrome and that seems to be better.) And I don't remember everything that I wrote! I guess it's a sign to start over. Anyway, I'm back with surprise, surprise: another pair of jeans, but not to worry, there are some other new me-mades in this post too. Woo hoo!

So this ensemble consists of another pair of Ginger-Angel Hybrid jeans (Angers? Gangels? Ginangels?), a sleeveless Granville, and a Hemlock Tee. All worn shamelessly with my slippers! What can I say, I love my fuzzy slippers!

So let's start with the jeans. I don't really have anything new to say about the pattern, as this pair is pretty much exactly the same as my last pair.  What does make this pair special is that they are made from a gorgeous 9oz Cone Mill's Denim from Threadbare Fabrics. There is just nothing like a good quality denim. It's so much nicer to work with, it presses nicely, and the best part, it's recovery is amazing. I can wear these baby's for days and they totally maintain their shape. (And by days I mean, I can comfortably wear them four or five times before I need to wash them, unless I spill something on them, ahem coffee,  which is pretty common for me 😝). The 9oz denim might actually be a little light for a regular pair of jeans, but I just couldn't resist the colour. It's a slightly lighter shade than the regular indigo you usually see in denim. It's not showing up very well in these photos, but it really is a bit lighter. While the weight of this denim might be a little lighter than what I'm used to, it makes these jeans extremely comfortable, and stretchy (they almost feel like leggings)! I do miss the (ahem) support that a slightly heavier denim would provide though. Plus because I used a quilting cotton for the pockets, you can sort of see the pocket outline through the denim, but that is mostly my fault as I should have went with some lighter scraps, but who can resist surfin' cats?

When I got my hands on this denim, I debated making something else out of it due to it's lighter weight. I thought it might make a lovely Chardon or Brumby skirt, a shirtdress or a jean jacket, or even quilted with flannel for a cool Tamarack jacket, but in the end I decided a pair of jeans would probably get the most wear. I almost tried out this pull on version (which I think would be perfect in this weight), but I was too lazy to try a new pattern this time, and I really wanted to make another pair of Ginger-Angels as I wear my first pair a ton!

For something a little different I decided to go with some red topstitching. I remembered Amy's pair and I loved how the red looked against the dark blue. I'm not sure my red pops quite as well as it did on her pair, but I still really like it. I think one of the really cool parts of making your own jeans (and your own clothes for that matter) is that you can change up those little details. I'm also planning to add rivets, but I haven't decided on the colour yet. Any thoughts? (I have brass, gunmetal, silver and copper.)

Anyway, enough about the jeans, let's talk about the tops. The lovely striped number is a Grainline Hemlock.  I made a Hemlock months ago, and decided that the boxy, one-size fits all pattern just wasn't for me. It seemed too shapeless and long for me, but then I kept seeing cool ones pop up in my Instagram feed, so I decided to give it another go. I mean, the pattern's free, so why not? This time I decided to forgo colour-blocking, shortened the body by 2.5", and made it out of a stripey fabric. I mean you can't go wrong with stripes, right? I am so happy that I gave it another shot. I have been wearing the two that I made pretty much non-stop. It's amazing how something changes when you get the length right. The other one I made is striped too, but I haven't blogged about it. I think this fabric came from my February Knitfix pack from Girl Charlee. It's a french terry, but it is on the thin side; you can easily see the pockets of my Granville coming right though it, so it might not be the best for layering over tops.

All summer, I really wanted to make a pale pink Granville top. I even found the perfect fabric at Blackbird Fabrics (it's a beautiful Italian Linen just like this one), but for some reason, I never got around to making one . So in my recent fit of cutting out 5 Granvilles, I decided to include the pink linen. It's a little seasonally inappropriate, but I figured it would work well under sweaters, and worst case scenario: it just hangs in my closet for a few months and then I know it will get a ton of wear when it warms up in the Spring and Summer. I had planned to use some cute little buttons, but when I spotted these cool marble snaps in my stash, I knew it was meant to be. I know they came from Snap Source because they were still in the package, but I couldn't find them on their website.

It still looks a little stiff, as I have't washed it since I made it and I starched it like crazy so it would be easier to work with. Linen always seems to stretch out and go wonky on me, and I found that spray starch really helped. 

Anyway, I hope that you all are having a lovely night, and please hug your loved ones tight and wish or say a prayer (or whatever you do/believe) for peace and the people in Paris. I don't really "pray" myself, but after crying while watching the news, I am trying hard to hold a space of love instead of fear (which I know is really hard), because a big point of these attacks is to evoke fear.

                                                                                                          Source

The Quest for the Perfect Jeans: Angel Bootcut Jeans Part 2

And we're back.....

Hey Everybody! What's chippin' your potato? How's the week going so far? I guess it's only Tuesday so it might be too soon to tell. As promised I am back with yet another jeans post. I mentioned in my first Angel Jeans post, I felt like I couldn't really give the pattern a proper review as I had done all this crazy slimming down to the legs, and I messed up my lengthening only the front rise. So I decided I would make it up again, but this time make it as close to the original as possible no messing with the leg width or the rise, or anything like that (I did make a few changes to make them fit me better, but that's about it). Alright, grab your coffee or tea, and let's get down to business

After wearing my first pair a few times, I decided that not only did the denim bag out quite a bit, they were just too big. I had chosen my size based on the size chart, but after contemplating it for a bit, I decided that this pattern must not be drafted with negative ease. It calls for stretch denim, but I think I must like my jeans much snugger than what Angela Wolf has drafted for. So I consulted my trusty Ginger Jeans pattern, and used the finished garment measurements to help me figure out what size to make. I ended up going down to a size 6. A size 6, can you believe it? I went down 3 sizes. Whoa!

The denim I used for this pair is an Italian stretch denim I picked up at Ditto Fabrics in the UK (and by picked up, I mean I bought it online).  It's actually really quite stretchy, so if I were to make these again in a stiffer denim, I might need to go up a size.  I have been on the hunt for the perfect denim for quite some time, and this was one of the many denims I have acquired (for research purposes of course). Anyway, I was bummed to find that it is no longer listed on their website because it's really quite nice. It's stretchy and comfy and the recovery is quite good. These pictures were taken on my second day of wear. They get pretty stretched out and need a good wash after a full second day though. And looking at these photos now, I think the fit looks better when they first come out of the wash. 

When I first tried these on, I was like, "I can't go back to wearing a flared/bootcut jean!", but after wearing them a couple times, the style has really grown on me. I think they are going to look really good with some little wedge booties I have in the back of my closet (I still don't want to admit that it's boot weather). They make me feel reminiscent to when I was about 17-18 years old and this was the style. I had traded in my beloved men's Levi's 501s, for a flared Silver Jeans pair. It was a radical change for me at the time, but I I remember feeling very ahead of the trend. 

I will get into the fit details at the end, but I have to say I'm pretty tickled with how these turned out. I think the fit is pretty close to perfect, and the only thing that I really want to change is to move the back pockets closer together. They are a little farther apart than I would like them, but not enough that I feel compelled to unpick and reposition them. And looking at these photos, I might need to scoop out the back crotch curve just a little more too. It's difficult to fit the back on your own. I usually get John to take a few iPhone photos when I'm in the process, but it's hard to see fit issues in dark denim in photos.

I used two buttons this time for my wide waistband, and unfortunately, I think I put the buttons a little too close together which seems to  cause the top of the fly to gape open a little. It's not really that big of a deal as most of my shirts cover it (speaking of which do you like my new longsleeve tee? It the Grail tee by Vesta Patterns), and really it's not that bad.

It's a bit hard to see it in the photos, but this time around I used a yellow variegated topstitching thread. It's a subtle change from the gold, but I really like it. And I'm happy to say that I get a little bit better at topstitching every time I do it. Hurrah!

Okay so here are the changes I made this time:

  • started with a size 6 (my last pair was a size 12)
  • lengthened the front crotch curve by 1" and the back by 2" using this tutorial again
  • shortened the legs at the lengthen/shorten line by 4 inches, but cut another inch off the hem at the end too
  • decided when I basted them together to check the fit that I might need a full or rounded thigh adjustment, so to compensate, I sewed the side seams from the bottom of the back yoke to the knee with a 1/2" seam allowance and the rest at 5/8" - next time I'll just add a little extra to the side seam when I cut them out
  • cut 1/2" of width off the belt loops piece to make the belt loops slightly narrower
  • did not interface the waistband, except for right at the button hole
  • sewed 1/4" elastic into the waistband (at the top) in the hopes that it would work as sort of a stretchy stay tape and help keep my jeans from falling down - I think it's helped a little but I may have needed to stretch the elastic more when I was sewing it in

I thought I would include a photo of my traced pattern pieces so you can see what the curve looks like. And check out the cute little spiral bound book for the instructions.

So there you have it. I'm really happy with this pair of jeans, and I have been wearing them way more than I thought I would. I have been a pretty die-hard skinny jeans girl for quite some time, so it's nice to add something different into the mix. I am hoping to make another pair just like this, but leave them a little longer to wear with heeled boots (and maybe fix the back pocket position too).

And as if this post isn't long enough already, I feel like I should include a few details about my t-shirt too. As mentioned, it's the Vesta Pattern's Grail tee. I just couldn't resist the cute drawings, and I really liked the idea of the different body shapes offered, plus it has two neckline options (a scoop and a crew), 3 sleeve lengths, and the option of making a tank top. You can buy the pattern in either the S Shape (for an hourglass shape), the E Shape (for a more straight body type) and the A Shape (for a more pair shape). I went with the S Shape, and made my first Grail tee a Large according to my full bust measurement. While the shape was really nice, it was really tight across the back, shoulders and boobs. [Super honest side note: Before I bought this pattern, I was humming and hawing between it and the Lark from Grainline, but the cute drawings and the idea of supporting someone brand new sucked me in! And hey, maybe it would be great! But after I made my first version, I was kicking myself, wishing I had bought the Lark. Lesson learned! (And who are we kidding, I'll probably end up buying the Lark anyway - I need that boatneck! I'm such a pattern junkie!)]

For this version in the photos, I made a straight XL (which is the biggest size) with the crew neck, and the fit is much, much better. I am happy with it, but beware that it runs small, and/or you may need an FBA if you have big boobs. This lovely long-sleeved number is made out of some amazing bamboo striped knit from Blackbird Fabrics, and it's soooooo soft and cozy! It's sold out now, but I'd keep an eye on Caroline's shop because I'm sure she'll restock it. She does have this glorious tie-dye bamboo that I bet is just as soft (well actually I know it is, because I have some of it too but in navy).

And with that, let's wrap this post up! If you've made it down to the bottom, thanks for hanging in there, and if you just looked at the photos and scrolled down, you missed all the details!! Go back!! Kidding! Kidding, I'm kidding.  I hope you guys are having a lovely Tuesday, or whatever day it is when you catch up with your blog feed! And not to worry, there are still more jeans posts to come!

The Laurel Dresses

So I tried to move on, and skip over the last of my summer sewing, but I just couldn't do it. I have all the photos done, and these are some of my favourite dresses, so it just doesn't seem right to not blog about them. You'll have to endure (or skip over) one more seasonally inappropriate blog post from me before I move onto the myriad of jeans posts I have planned.

 I may have gone a little crazy with this pattern this summer. The Colette Laurel dress is the first dress I ever made, and I've made a couple since then, and I quite like my last iteration. I think a shift dress is super easy to just throw on, and can be quite flattering if you can get the fit right. For me that means body skimming, but not to boxy.

Get ready for a picture heavy post!

This one is made from a nice lightweight cotton I picked up at Fabricland in Salmon Arm last summer. It's the perfect weight for a summer dress.

I shortened the dress by 1.5" and the sleeves by 4". This makes for a pretty short dress, so I have to crouch if I drop something. No bending over in this little number.

I think this one is John's favourite. It's made out of cotton that he picked out for me at Fabricville in Montreal. I really love the navy and green combo. I wasn't sure if it was summery, but I think it works.

Apparently I wasn't too worried about pattern matching, but I'm pretty chuffed with my invisible zip. Where is it? LOL

This dress is made from a beautiful linen I bought from Blackbird Fabrics. I'm sure you've seen it around, it also comes in a taupe colourway too. The linen is really soft and perfect for summer.

Unfortunately, I think I stretched it a bit while sewing and ironing, because my bust area/darts are looking a little wonky.

I think I did a pretty good job with my stripe matching, and I didn't have a matching 22" zip, so this one got a 9" zip and that worked out just fine. John doesn't love this fabric nearly as much as I do, and he affectionately refers to this dress as the dishtowel dress. Now that's all I see, anytime I see this fabric.  I wore it a lot as it was super breezy to wear.

That photo's for all my fellow Napoleon Dynamite nerds.  You remember that photo shoot scene right? I was obsessed with that movie when it came out, and still quote it quite regularly.

You still with me? Now that we've gotten through all those photos lets talk about what I've done for fit alterations, and then I'll show you one more dress. I told you I went shift dress crazy!

I started with a size 6, then:

  • I did a 1.5" FBA (for 3" total)
  • a 1/4" high round back adjustment 
  • 3/8" forward shoulder adjustment
  • shortened the dress at the lengthen/shorten line by 1.5"
  • finished the neck and armholes (on the sleevless versions) with store bough bias tape
  • then I slimmed the dress from the bust down to the hem by about 1/2" - on my first floral version I did this before I hemmed it, but then I changed the paper pattern piece for the 2 other versions
  • serged and turned the hem under

Seems like a lot for a little shift dress doesn't it. The good thing about working out all the fit issues is when you're done you have a great fitting dress pattern, you can make over and over again.

Okay, if you've hung in this far, thank you! On with my last and favourite Laurel of the summer. It's definitely not the best fitting one of the bunch, and probably the least summery, but I love it! I also should mention that I keep putting it in the dryer which is such a big no no, because it shrinks a little everytime it gets washed. This seems to happen to all my handmade denim garments. Even my jeans!! When will I ever learn?!

This one is made with a gorgeous, polka dot, tencel denim I got from Blackbird Fabrics. It really is a beautiful fabric, and I really wish I had bought a lot more of it. It's so soft and drape-y, and how can you go wrong with denim? Sadly, it is now sold out, but there is this cool animal print-ish one. I may just make this dress again in that one.

I have wanted a denim shift dress since I saw Caroline Amanda's on the Sewaholic blog. But I wondered if it might be a little too plain for me. I am, after all, a bright colours and prints kind of girl, especially when it comes to dresses. But when I saw the spotty denim, I knew it just had to be. Then to top it all off, I saw this blog post - and I thought a split bust dart would be such a cool little detail.

This was my first time trying a split bust dart, and it didn't exaclty work out. Maybe I should have practiced/muslined a bit more before I tried it in my lovely fabric. I used this tutorial here, which was the only one I could find and I think I ended up taking a little to much fabric up in the darts. I had a hard time figuring out exactly how much room you put in between the darts. And that's why I think this one is so much tighter than my other 3. Plus the darts are a little long for my liking, but I think that was my error.

If you guys have any tips for me about splitting darts, or if you know of any other good tutorials,  I would love to hear about them, cause I love this idea. Fit issues aside, I still love this dress, and I know just throw a sweater or cardigan over it, and wear it lots. It will be great with tights and boots for fall/winter too. I actually wore it quite a few times already just as is, but it is a bit tight around the boobs, so it's not the most comfortable.

Other than splitting the dart, the only other difference between this one and the others, is that I actually made self bias tape to finish the neckline. Woo hoo! Oh and the sleeves are slightly longer too.

Alright,  that's it, we are all caught up on the summer sewing (well at least the stuff I wanted to blog about anyway). Thanks for hanging in there with me. Now we can get on with the Fall Essentials, and the JEANS!! Woo hoo!