More Southports!

So now that summer is officially over, and Fall has started, why not have a look at more summer dresses! I'm on track for my friends in the Southern Hemisphere. Ha ha! I actually made these dresses in the early days of July, but never got around to blogging about them until now. I wore them quite a bit though.

So just in case you are new to the sewing/blogging world, this is the Southport Dress by True Bias. I think when we look back at the summer of 2015 as sewing bloggers, it should be known as the Summer of the Southport Dress. I've seen so many of them pop up over the summer and it seems to look beautiful on every one. It's such a great staple, easy to wear and pretty easy to sew too.

I didn't actually make the maxi version this year, but it looked really lovely on the people I saw make it up; like this one, this one, and this one, just to mention a few. 

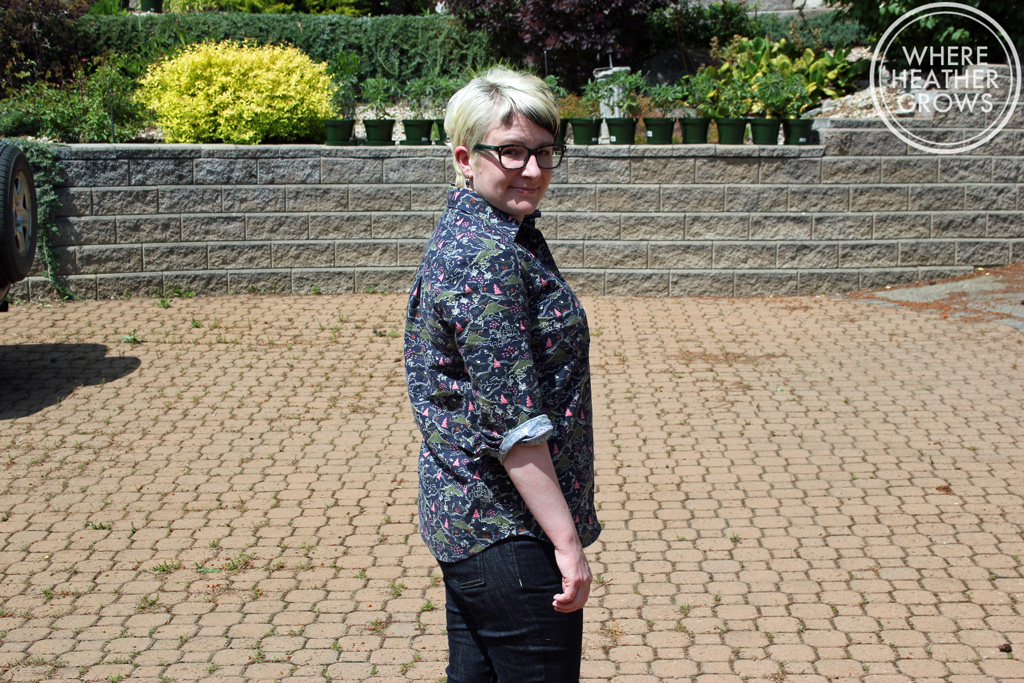
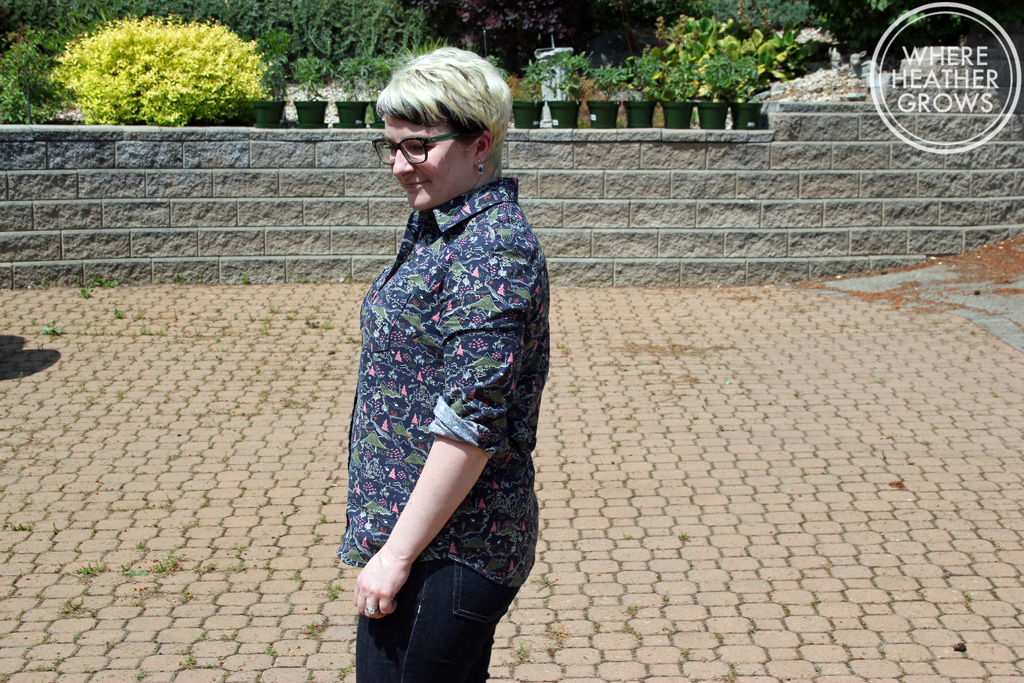
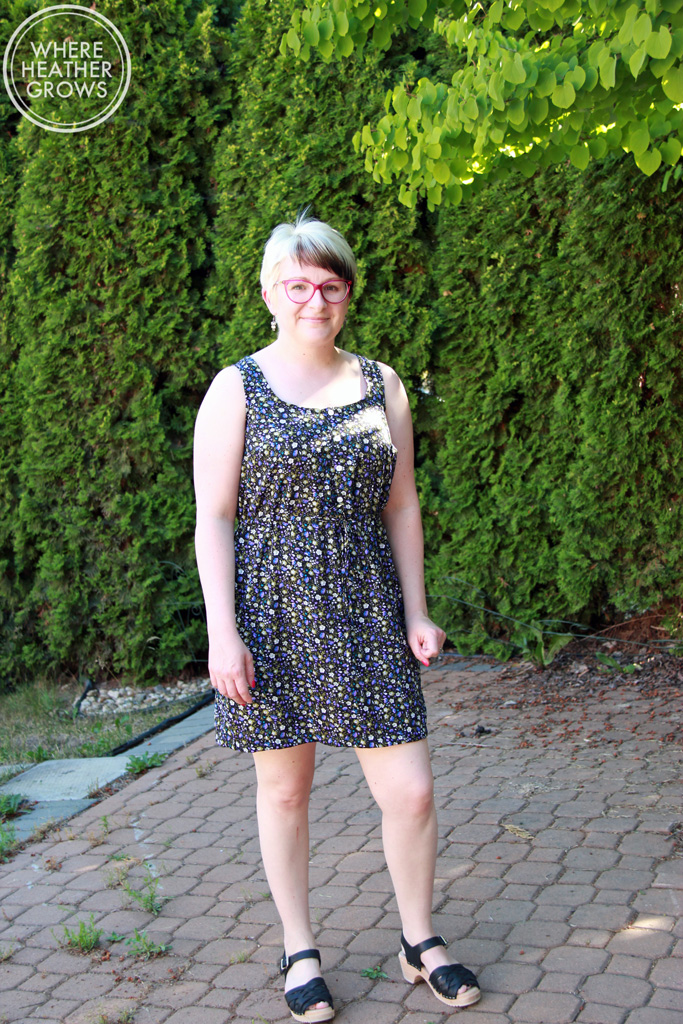
It's quite hard to see, but there are little green buttons on this version. My placket is sewn shut because I don't need it to get in and out of this dress, and I didn't want to leave it open to any potential gaping issues in these slippery fabrics.

IMG_7291.jpg

This gorgeous floral fabric came from Fabricville in Montreal. It feels incredibly soft and silky, and the colours are nice and vibrant. I have no idea what to call it, but I'm sure it's some sort of polyester - maybe a polyester crepe de chine?

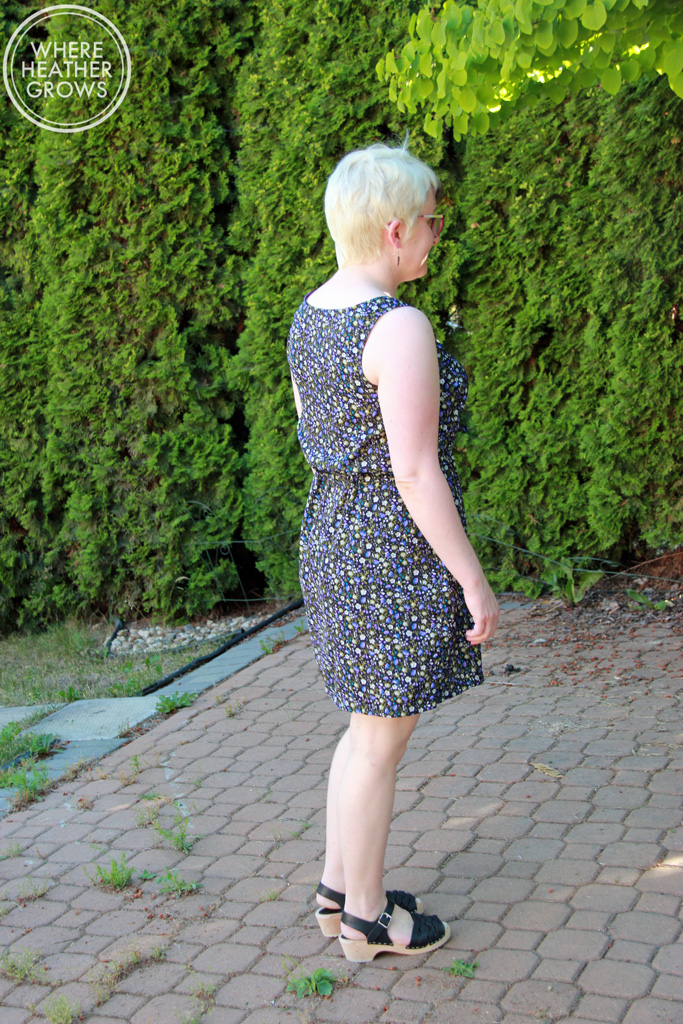
My second version here, is exactly the same as the first only with 100% more flamingos!

I am really satisfied with the fit, although this one looks like it could use a good press.

                                                                                                    Pug Photo Bomb!

I also like that this dress has a drawstring. It makes it really comfortable, and if you are having one of those bloaty days or going to an all you can eat buffet, it's easy to just tie the drawstring a little looser. This lovely flamingo rayon came from Gold Hawk Road in London. John wasn't overly enthused about it, but I just had to have it!

Now for the fit details. I made these two exactly like my last version, except I went up to a size 8 in the bodice. It was hard to see in my last Southport post because of the busy fabric, but it's slightly tight across the back. Going up to a size 8 fixed that issue. So for those of you interested, here are the gory details:

  • a 1 1/4" FBA (For 2 1/2" total)
  • a 1/2" high rounded back alteration
  • a 1/4" forward shoulder adjustment
  • used a size 12 skirt
  • sewed the front button placket shut

I could probably just sew a straight size 10 like my very first version, but I found it gaped at the neckline and didn't fit me in the shoulders as well. Fitting is not for the faint of heart and I really think it takes a lot of trial and error. But with every make I learn something new, and I'm getting to know my shape just that much better. It's all part of the adventure.

Also, I've read a couple posts, and listened to a couple of podcasts in the last little while that talked about sharing measurements. I am always a bit hesitant to share my actual numbers, but I started thinking that I'm putting all these photos of myself out there and if you wanted to, you could probably take a pretty good guess at my measurements anyway (especially if I'm telling you the sizes of the patterns I make). I also think that sharing your measurements helps other sewists judge what sizing/fitting fixes might work for them. So in the interest of helping others, here are my measurements: high bust - 37", full bust - 39", waist - 32.5", hip - 39.75" and my height is 5'2". Yes I am Canadian and should be using the metric system, but when it comes to sewing, I prefer the Imperial measurement of inches. I will mention that my measurements do fluctuate a bit, but these are the most recent ones that I've taken. So there you have it.

Have you made a Southport Dress this summer? Are you up for sharing your measurements? (It's completely fine if you're not.)

                                                                                  Gratuitous Pug Shot - Quincie during the Golden Hour :)

Maria Denmark Edith Blouse

Guys, I keep taking these unintentional blogging breaks. I don't know what is going on with me, but I seem to be adverse to blogging lately. Anyway, I am deep down the rabbit hole of jeans making, but I'm not quite ready to share all that with you yet, so let's take a look at one of my summer projects: the Edith Blouse by Maria Denmark.

This blouse has been on my radar for quite sometime, but Helen's pushed me over the edge. Aren't they gorgeous? Those Carline Liberty prints are amazing! Anyway, when I went onto Maria Denmark's web page to buy the pattern, I discovered that you could purchase either a B or C cup pattern. I went with the C cup pattern, chose my size via my upper bust as usual, and proceeded with my normal full bust adjustment.

I think this worked out okay, but I'm not in love with the fit. It looks pretty good as long as I don't move. Ha ha! I should also mention that the pdf was easy to put together and the drafting is really good. The only issue I have with the pattern itself is that you have to add your own seam allowances and I hate doing that! What can I say, I'm a lazy sewist.

I'm not sure if it's my fabric choice, which is a medium weight cotton from Fabricland, or because I should have just picked my size based on my full bust measurement, but I am not happy with the fit. It doesn't look too bad in these photos, but when I move the whole shirt moves with me. If I move my arms the shoulders move up to my ears. It makes this top a little uncomfortable, and I'm thinking it's not meant to be that structured. My darts are a little bubbly and probably a touch too long (not my best sewing), and it almost looks like I don't have enough room in the bust still. I think that's a bit strange and makes me think that I should have just went with my full bust size. What causes those diagonal wrinkles, does anyone know? 

While I do quite like this blouse, I'm not sure it's really me, so I didn't attempt to remake it like I normally would. I am currently thrilled with my Archers, and my sleeveless Granvilles, so I didn't pursue Edith. I may go back to it next summer, but who knows. I like the idea of the dress version so maybe.

I wanted to go with red buttons, but I didn't have any in my stash that I liked, so I chose yellow, and I'm really happy with the combo. It's a shame I don't really like the fit. I still wore this blouse a few times this summer though, so not all is lost.

I've decided to leave all my adjustments to last, as I like when other sewing bloggers do that, and then all the fit stuff is in one place, so here we go:

  • started with a 38 C
  • did an FBA of 1.5" (3" total)
  • moved the dart point up to be in line with my apex point
  • moved the fish eye dart up by an inch because I moved the bust dart
  • did a 1/4" forward shoulder adjustment
  • added 1/4" for a high round back adjustment
  • and lowered the armhole by 1/2"
  • finished the hem with bias tape

Phew! That was a lot, thank goodness I take notes! John wasn't super keen on the flat collar. I was surprised as he usually likes retro style, but he, like me, prefers my Archer and Granville collars. Am I sounding like a broken record yet?

Anyway, I hope you had a great weekend.  Are you sewing for fall yet? I haven't made a plan myself, but I've seen a lot of great ones out there, particularly Katie's. I love her fall/winter list so much that I just might copy it, in different fabrics of course. Ha!

The Sisterhood of The Travelling Fabric

Hi Everybody!! Oh my goodness, where have I been? Well lots of places actually. While I have been sewing since my last few posts, I just have had no desire to blog. What's up with that? So I have a big back log of things to blog about. Plus John and I took a trip to London, so I want to tell you all about that too! But before I get too overwhelmed let's get to The Sisterhood of the Travelling Fabric

A long, long time ago (last March) in a faraway land (Bangkok), a lovely sewist called Meg made her husband a chambray shirt. The fabric looked so lovely, and deliciously stripey that I couldn't help but fawn over it. Come on, who doesn't love a good chambray? And a striped chambray to boot! Oh and the shirt looked really nice on Tim too! ;) Anyway, being the lovely lady that she is, Meg contacted me a few days later with an offer to send me, and Nicole (who had also made a fuss over the fabric) some of the aforementioned chambray. Of course I am not one to turn down fabric, so we all decided that it would be great to make it a three way swap in the spirit of Lola's Sisterhood of the Travelling Fabric. The amazing sewing community strikes again! 

Anyway, I still haven't made anything out of the chambray, though it does sit in my fabric cupboard where I can gaze at it daily, and take it out and fondle it to my heart's content. I just haven't come up with the right project for it. Would it be weird for me and Meg's hubby to have matching shirts? I did however work up the courage to cut into the beautiful rayon challis that Nicole sent me. How did she know I love blue? ;) I hummed and hawed over what to make and narrowed it down to a nice summery shirt, or another Southport dress. With the help of my design consultant (aka John), we decided that I should make a nice summery, sleeveless blouse. This resulted in my first attempt at the Granville. I know that I blogged one already, but that one was actually my second attempt.

I chose my size based on my waist and hip measurement, with the help of the finished measurement chart, and then once I had traced out the pattern pieces and preformed an FBA, I compared them to my Archer pattern pieces and decided I would be okay to jump right in without a muslin. 

Everything went quite well. The fabric was tricky to cut out, but I thought that I had done a pretty good job. I thought it looked a little bit wonky when I finished, but it wasn't until I saw it in these photos that I realized just how awful it was.

Oh my goodness, how could have miss that? The collar is totally lopsided and look at the button band!! 

Ahhhhhh! And look at the armhole! Side boob anyone? I felt so badly about this shirt. Partly because I felt stupid for not realizing just how wonky it was, but also because the fabric had been gifted to me. I was super embarrassed and I had to work up the courage to point out all the flaws to John. I mean I have been sewing for a year and a half, these silly mistakes shouldn't happen to me! Ugh!!

Anyway, lucky for me, there was enough fabric to squeeze out a remake. I was a little worried that I had done something wrong with my FBA or the pattern somewhere, so that's when I decided to make the first Granville I blogged about. Once it was finished (and a success), I went out and bought some spray starch and very, very carefully cut out a mulligan. I should also mention that I cut it all out on one layer, no fold. That really seemed to help. I made sure to compare the pattern pieces to the fabric as I went along to make sure there had been no shifting, and then I carefully sewed up a new shirt.

That's better! I am happy to tell you that while it's not perfect, it is sooo much better and I am so happy with it! I have been wearing this shirt pretty much constantly since I finished it. Seriously, I must wear it about twice a week.

See how the armhole fits so much better on this one? I really think that had to do with my cutting job. 

I love the princess seams in the back of this pattern. Such a nice fit!

So I did a number of alterations to that you might want to know about, here's my list:

  • a 1.5" FBA and moved the bust dart up 1 1/2" so it lined up with my apex
  • shortened the shirt by 3 1/2"
  • a 1/4" high round back adjustment
  • I shortened the shoulder seam grading out to nothing about 3/4's of the way down the armscye to make this shirt sleeveless. See this tutorial.
  • the armholes and hem are finished with store bought bias tape

It took me a while to decide whether or not to share this shirt with you. I could have easily just shown you the "good" shirt and left out the "bad" one. But I decided that it is all a part of the learning process and I should document my mistakes and failures as well as my successes. 

I am so grateful to Meg for initiating this fabric swap, and I am so thankful to Nicole for this lovely fabric. I want to apologize for wasting some of it, but I don't really think it was a waste. I learned a lot! And now I have a beautiful shirt that makes me think of Nicole every time I wear it (and a wonky one hanging in my closet as a reminder to take my time). So it was a win win in my book!

Thanks for hanging in there for this long post! Have you ever swapped fabric? Do you have any slippery fabric cutting horror stories? I'd love to hear them and any tricks you may have picked up a long the way.

Sewaholic Granville for Summer

So I think we all know just how in love I am with button-up shirts I am. In fact, if you have read this blog for more than three posts, I am sure that you know about the intense love affair I have had with Archer.  Many moons ago (okay not so many, but you I like to be dramatic), Tasia over at Sewaholic released the Granville shirt. I was very intrigued by Granville, as it seemed to have a softer, more curvy shape, and these gorgeous princess seams in the back; and all round more feminine look that Archer. I bought the pattern right away, and then it sat on my shelf. I couldn't bring myself to cheat on my beloved Archer. It just seemed wrong.

Then I made my last Archer and noticed how many I have in my closet. I was craving working on a button down shirt, but the only way I could justify it was to try something a little different. And that's how this sleeveless, summer, Granville shirt came to be.

I don't seem to very thrilled in the above picture, but don't be fooled. I love this shirt! It's the perfect companion to my collection of Archers. 

Sewaholic patterns are drafted for a pear shape, and I am much closer to an hourglass, so I chose my size based on my high bust measurement (with the help of the finished measurements chart), and then did a full bust adjustment. I have been forcing myself to do FBAs lately, and while I do still find figuring out when I need one a bit confusing, I think I am getting better at it. I have read a lot of material, that would suggest that I don't actually need an FBA (I only have a 2 inch difference between my upper and full bust measurements), but in the garments I've made lately without one, it appears that I do in fact need more space for the girls.

So anyway, I started with a size 10, and then did a 1.5" FBA, which adds a total of 3 inches. If I had gone by my full bust, waist and hip measurement to choose my size, I would have had to go with a size 14 bust and waist, and a size 8 hip. I think I could have done that with simple grading between sizes, but then I have a feeling it would have been way too big in the shoulders (a common problem for me), and it probably wouldn't have maintained it's nipped in waist shape. I also debated doing that (the grading between sizes), and then doing a narrow shoulder adjustment, but I still think that, that would have resulted in a poorer fit in the shoulders. This is quite the journey, this fitting business, isn't it? 

There are a few wrinkles in the back in the above picture, but I really think that's just from moving around; I'm really happy with the fit at the back. While you can't really see them in this busy print, the princess seams really do create a nice shape at the back.

To make this shirt sleeveless, I used Jen's tutorial for a sleeveless Archer and it worked out really well. There was a bit of trial and error becasue I think it's a bit of personal preference to where you want the shoulder to end, but I am really happy with where it is on this shirt. I ended up removing about 5/8" and grading to nothing.

The fabric I used for this shirt, is a lovely cotton that I picked up from the Man In Front of Sainsbury's at Walthamstow Market. It is nice and light and perfect for a summery shirt. For the collar construction, I skipped Tasia's instructions and did my normal collar method I learned from Andrea. I am interested in trying Tasia's method at least once though, as it is different than any I have seen before. I do find the collar a little bit big on this shirt, but it may just be because I am used the Archer's collar. I should also mention that I shortened this pattern at the lengthen/shorten line by a whopping 3 inches! I think it's safe to say that I am significantly shorter all around than Tasia. LOL

I have been wearing this shirt a ton, and I really can't wait to make more of them. It won't replace my beloved Archer, but will be a welcome addition to my TNT collection. Have you tried Granville yet?

Also if you follow me on Instagram you will know that John and I are currently in London. I am having an absolute blast fabric shopping (and John has been an excellent fabric shopping companion), and I can hardly wait to get home and get sewing! Today is a rainy day, so we are just taking it easy and catching up on our favourite British game shows. So I thought it would be a good time to catch up on some blogging, I'm so behind!! Hope you all are well and enjoying your August so far!


The Brumby Skirt

Or shall we call it the frumpy skirt? I truly have mixed feelings about this one. Part of me loves the midi length, and part of me thinks it makes me look super short and frumpy. Anyway, I made this skirt a number of weeks ago now, and I haven't worn it once, well except for these photos. I keep meaning to put it back on, but I never seem to reach for it.

I think part of it is the length. I have really wanted to try a midi length for quite some time but Lisa's really pushed me over the edge (although she is quite a bit taller than me, I think). I had dreams of swooshing around in a lovely 90s-ish floral skirt, but that hasn't really happened.

But the other part of it, is that I struggle with what to wear with it. I think it looks okay with a tank top, and maybe I should try it with a Nettie, but I was hoping for something a little more polished looking. I have dreams of a white sleeveless button up shirt, but that might be too bulky to be tucked in. I was also playing with the idea of a cropped top as this skirt is so high-waisted.

I think the fit is pretty good. I went with the largest size based on my waist size. It looks really good from the front but I am getting this weird bunching with the back waistband and it does not create the most flattering rear view. This isnt' the greatest shot, but I think you get the idea. Is this a fit issue, or is it just one of those I'm squishy issues? I'm wondering if there is an adjustment I need to make to make it sit straighter. Maybe the waistband is just a little too wide for my torso?

Anyway, let's talk about the pattern. It's Megan Nielsen's Brumby skirt and it's a great pattern! The pdf went together quickly and easily, and I used her new app for step by step instructions. The app is free and it's so cool! Plus it saves all your Megan Nielsen patterns in one place. I really love all of the details on the skirt - the large pockets, the front centre seam, the cool exposed zip which I didn't really get a photo of with the finished skirt, but here's a photo of it just after I inserted it:

Megan's instructions for the exposed zip are awesome and she even has a more detailed tutorial on her blog. I will definitely refer to her post any time I want to do an exposed zip. I think it's a pretty interesting little detail that you can add to lots of different patterns. This skirt would work well with an invisible zip too, if an exposed one is not your thing, or you if want a dressier vibe. 

This skirt came together quite quickly. I think the trickiest part for me was working with a slightly shifty fabric again. Practice, practice, practice! That's what I keep telling myself. This lovely floral is another mystery fabric (probably a poly) from Walthamstow Market on our last London trip. The other good thing about this skirt pattern, is that it appears to work with pretty much any type of fabric. I think I'm going to try the shorter version in denim or chambray for the fall and winter. I think I would probably get a lot more wear out of the shorter version and I'm debating shortening this skirt too. 

And a Megan Nielsen Brumby skirt post wouldn't be complete without a Maker tee shot too. I loved the Maker tee/Brumby skirt shots of the model, but I'm not sure it looks quite as good on me. But I do love the t-shirt. So comfy and it fits great! Plus it supports a great cause -you should really check it out, if you haven't already.

So there you have it. I have a huge back log of projects to blog so it feels really good to have this post finished! I seem to be making tons of time to sew, but no time to blog. Oh priorities! 

 Have you tried a midi-length skirt? 

The International Anna Party

Hello Everybody! How are you? What do you think of the new digs? (I hope you like them cause it was quite a bit of work to change everything around. LOL)

This is my By Hand London Anna dress that I made for the International Anna dress Party happening today on Instagram.

I actually started this dress quite a while ago, but I never finished it for some reason. It sat on my dress form for forever. Which really isn't like me. It usually bothers me having an unfinished project lurking in the sewing room. Anyway, the #internationalannaparty was just the push I needed to get this bad boy finished.

The bodice of this dress is a straight size 12/16, and then instead of doing the panelled skirt that comes with the pattern, I decided to do a circle skirt. It took me awhile to get my head around the math part of making a circle skirt, but I finally got it. I have never been good at math. The bodice fits me pretty well, although my fitting brain is wondering if I could make it fit even better with a smaller size and an FBA. I seem to be all about the FBAs lately. I think the Anna dress is a really flattering sillohuette, and I think it looks really great on pretty much every shape. Just ask the Google, and you'll see what I mean. Anna was the second dress pattern I ever tried when I first started sewing, and it was so nice to sew so it will always have a special place in my heart.

I got this lovely daisy fabric at Walthamstow Market in London, seems appropriate, no? It's lovely, and drapey, and has a little bit of stretch to it too. I think it might be some sort of crepe, but I'm not 100% sure.

The circle skirt turned out really well, and all I want to do is twirl around it. I'm such a goof! The only bummer about a circle skirt is the hem. Holy crow that's a long hem. I took the easy way out and did a rolled hem with my serger. I'm happy with how it turned out. The black thread just fades into the background, so you can hardly even notice it anyway.

It wouldn't be a party around here without a pug or two, and it appears that they are enjoying have a look up my skirt. Silly pugs!

Did you guys join in on the Anna fun? 

The Southport Dress Take 2

Hiya friends! How are you doing? Hopefully the summer is treating you well so far. We are back at the cabin escaping the craziness that is Calgary right now. It's Stampede time, and the city always becomes filled to the brim with tourists, traffic, and crazy cowboys. The Greatest Show on Earth is a lot of fun if you've never been before, but if you've been a bunch of times, and you're not a fan of crowds and weird deep-fried food, it gets old pretty fast. Plus I am really not sure how I feel about the rodeo anymore. It just seems so detrimental to the poor little animals. But anyway, I don't want to get too controversial over here on the old sewing blog, so let's get back to the good stuff. I have wanted to sew up another Southport Dress for quite sometime, but haven't managed to get to it. Until now that is. And of course because I am being a crazy fit fanatic as of late, I wanted to make some changes to see if I could get my second version to fit a little better than my first version.

IMG_7081
IMG_7081

For my first Southport, I made a straight size 10. It fit pretty well, but I found that it was slightly big in the shoulders and a bit loose all over the bodice. I know that this dress is meant to have a relaxed fit, but when I wore the size 10 it would slip off my shoulders with movement, and I found that it was a bit gape-y in the front (the neckline was a bit low for me), especially if I bend down. I also thought the skirt was a little snug around the hips. So for this version I wanted to try and fix those issues.

IMG_7082
IMG_7082

I started with a size 6 bodice based on my upper bust size, but in hindsight, I should have chose the 8. I got everything to fit pretty well, but it's just a teensy bit too tight around the back/bust area. Anyway, I started with a size 6 bodice and adjusted the back pattern pieces first. I did a 1/4" forward shoulder adjustment - this involves shaving 1/4" off the front pattern piece, and adding 1/4" to the back pattern piece. Then I did a 1/4" high round back adjustment, and I wonder if maybe I need a 1/2" for this pattern, so I might try that next time too. Then it was on to the front pattern piece.

IMG_7083
IMG_7083

For the front, I did a 1 1/4" FBA. It's interesting how now that I have done a couple of FBAs, it seems like such a natural adjustment for me. I don't know why I've been so scared of it. Of course I haven't attempted an FBA on princess seams yet, so my confidence might recede.

IMG_7085
IMG_7085

For the skirt, I used a size 12 and it feels better than the size 10. I have a bit more room to move around and play with the pugs. I measured the pattern pieces to make sure that the skirt would fit the bodice and with my alterations they seemed to match up just fine. I finished the armholes and neckline with pre-made single fold bias tape. I love bias tape as it makes for a clean finish and I think it looks really profesh too. I also ended up sewing the button placket closed. I was being a bit lazy, but I also knew that I would be able to slip this dress over my head and that I wouldn't need the buttons. They are a bit hard to see because of the busy floral print, but the buttons are white and came out of one of those bargain button bags. John spotted them at Fabricville in Montreal and bought me two - one with coloured buttons, and one with black and white buttons. It takes a bit of searching to find ones that match, but it's nice to have a button stash.

IMG_7087
IMG_7087

Oh I almost forgot to tell you about the fabric. I have no idea what it's made of, I suspect come kind of polyester/rayon/viscose, but I can't be sure (are there any tricks for that?). I picked it up at Walthamstow Market in London. It feels nice to wear; cool and drapey, and I love the purple flowers.

I suspect I will be making a few more of these dresses before the summer is through. They are just so easy to throw on, and I love the drawstring waist; so comfortable (and easy to adjust after a big meal LOL). Plus pockets! I never really put anything in dress pockets, but I like to have them so I have somewhere to put my hands.

Anyway, that's all for now. Have you tried the Southport Dress pattern? Do you have any go to comfy sundress patterns? I'm always looking for good ones so let me know.